Data dominates our life whether we are aware of it or not. It’s everywhere and in practically everything we do. The same can be said for the digital contracts that we use, and the documents that we e-sign. But what is a data field? And how are they used in Oneflow?
That’s what we’re going to answer with this blog and by the end of it, you’ll know why data fields are so important to your contracts. And how the set up of them with any of our integrations make your workflows much more efficient.
What is a data field?
A data field refers to an individual unit within a data record or a database that holds a specific piece of information. It is the smallest, most basic unit of data in a database or a spreadsheet, designed to contain a single characteristic or attribute of an entity.
In easier to understand terms, consider a database where each row represents an entity (like a person or a product), and each column represents a specific attribute or characteristic of that entity (such as name, age, address, price, etc.). Each of these columns represents a data field, storing a specific piece of information relevant to the entity it describes.
For example, in a table of customer information, the fields might include:
- “Name”
- “Email”
- “Phone number”
- “Address”
- “Date of Birth”
Each of these fields represents a distinct piece of information for each customer, and together they form a comprehensive dataset for managing and organizing the information within a database or system.
Data fields in Oneflow
Data fields in Oneflow are a way for you to automatically map repeated information throughout your contracts. To take the example of a data field from above, you can use the “Counterparty name” data field inside your contract, that then can be mapped to be auto populated throughout the rest of the contract. So wherever you map that “Counterparty name” data field in the rest of the contract, the name that you entered will be there. You only have to enter the information into the data field once. It’s a smart and simple way to speed up the admin process while ensuring that basic information is captured and stays consistent inside the contract.
How to set up a data field in Oneflow
To enable the ability to use data fields in Oneflow you have to set them up manually. Don’t worry, it can be done in a few short steps! Just follow these quick instructions in order to get them up and running in your contracts.
You need to activate Template groups in order to use data fields in Oneflow.
- Go to Admin > Extensions.
- Scroll to Template groups > Toggle the control to activate it.
- Click on the text Template groups > Add a template group.
- Name the template group > Confirm.
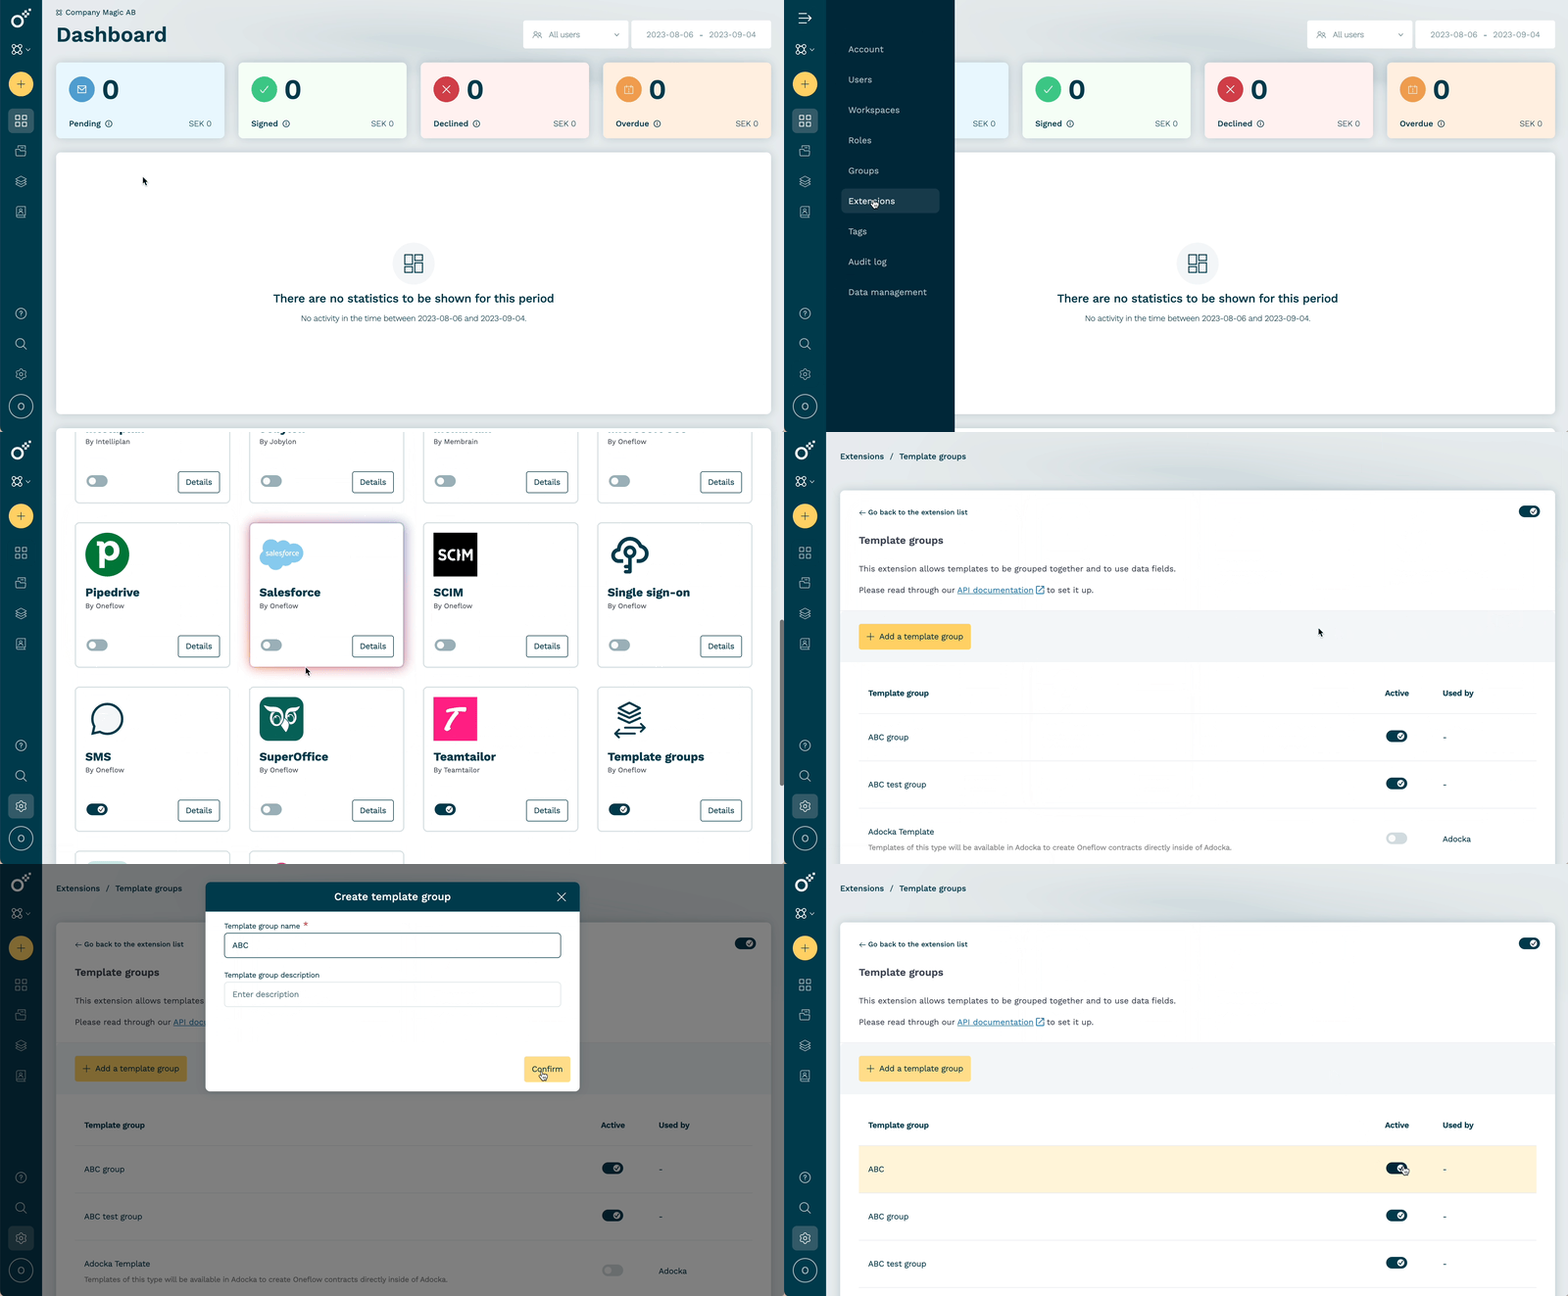
Why set up data field via a template group? Good question. That’s because you can use the template groups as a solid way to classify and organize your data fields. For example, some data fields are related to certain templates, or different teams, or different integrations.
Up next, you’ll want to create a new data field that will be used in the template group that you just created.
How to add data fields to a template group
We just created a template group, and now it’s time to add some data fields. We can very easily do that by following the steps below.
After creating a template group, this is how we add data fields to it:
- Open the template group > Add a data field.
- Name the data field, for example, “Customer name” > Confirm.
Add more data fields you wish to use in templates with the selected template group.
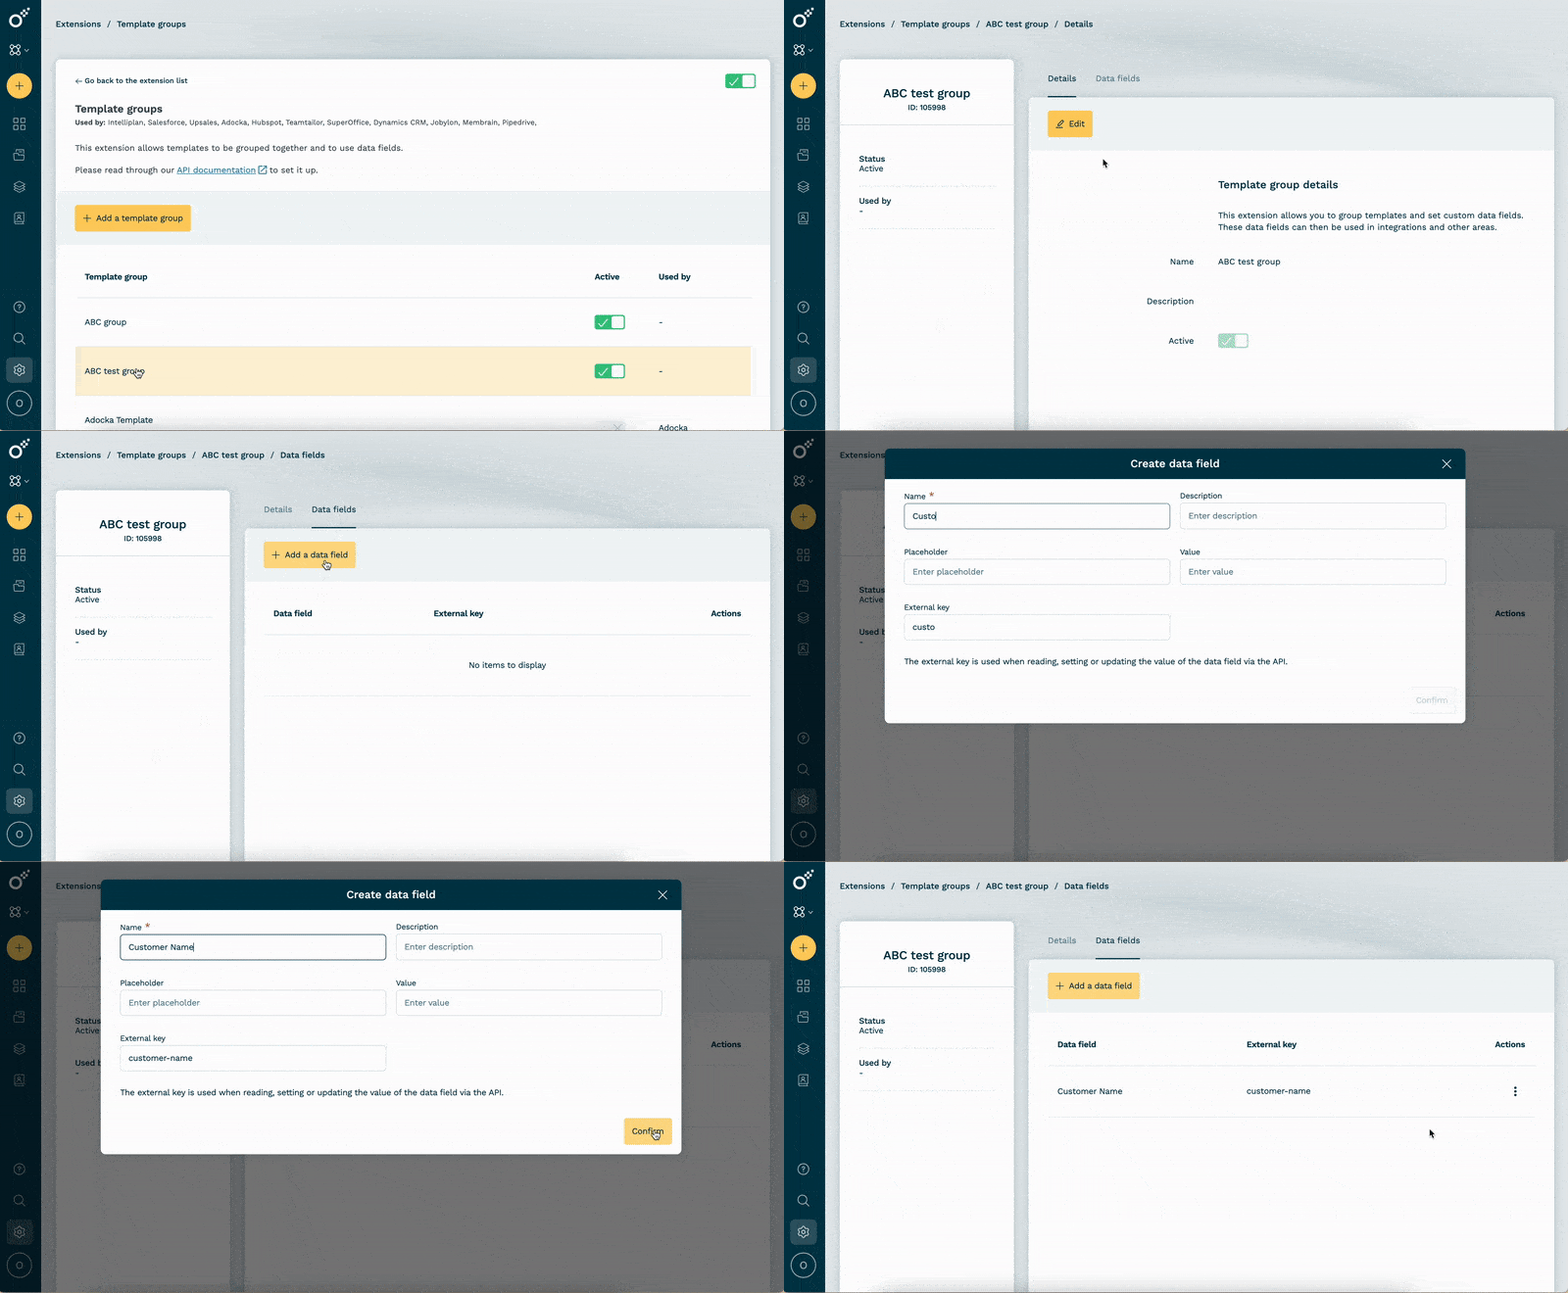
Keeping the example from above, we can call this data field “Counterparty Name.” We’re going with the customer name because it’s likely that throughout the contract, that name is going to be repeated a bunch of times. So with that in mind, we’ll make this a data field. Because every time this data field is inserted into the contract template, the customer name that you filled out will auto populate with the name.
If you are creating a data field that’s tied to an integration, you’ll need to enter an external key in these fields. It’s also wise to add a description for this data field you’re creating, so that anytime it comes up, your users will see a brief explainer of what that data field is about.
Alright, now we’ve got a data field created. We’re really in business!
However, there’s one more step to complete before our data field mapping process is complete. And that’s adding our data field to a contract template.
How to add a data field to a contract template
The final step to get your data fields working inside of your Oneflow contracts is to attach them to your contract templates. We did the tougher part of creating them, and now a super simple step of just attaching them is the final hurdle before we’re ready to fully work with our new data fields. You just have to follow these easy steps to get them attached to your contract templates:
- Go to Templates > Open a template that you want to implement data fields.
- Click on Settings > Open General >Choose a template group in the drop-down list.
- Start placing the data fields in the template > Click the “+” icon in the template > Form.
- Click Add field > Select a data field in the drop-down list > Save.
When a form field is mapped to a data field, a link icon will appear next to the name of the field.
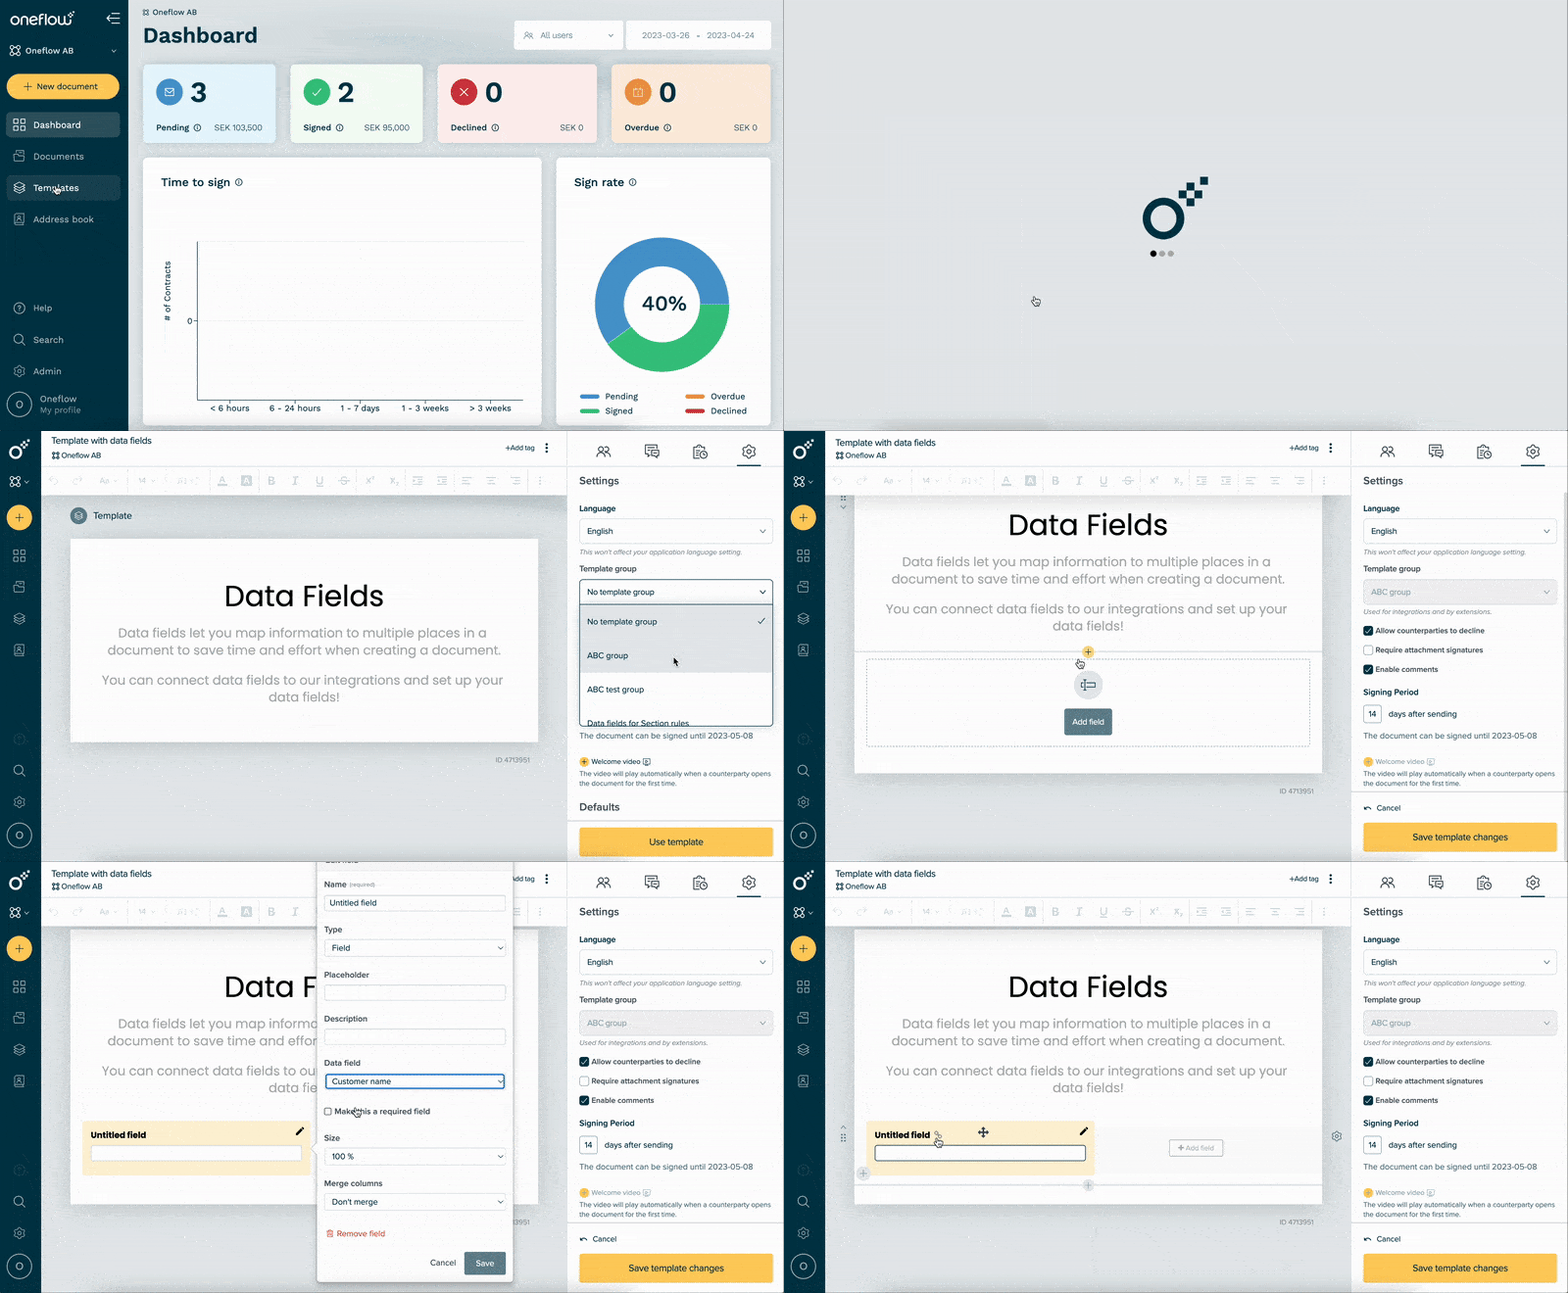
Those data field that we just created will be available to use in the contract. And anytime that the form field that you link to the data field appears in the contract, it will auto populate with the information that is entered in that form field.
To keep with the example we’ve been using, it will be the “Counterparty name” that shows up since this data field is now linked to that form. Depending on where you put that form field inside of your contract, the information will always be pulled forward from that initial entry.
And there you have it, you have now mapped your data fields into your contract successfully!
More about data fields in Oneflow
To learn more about how to use data fields in Oneflow, or get a video breakdown of it. Check out this Oneflow Hack video made by Hanna, it explains everything in great detail and is easy to follow along!


